10.4.1. 前言
DSP示例包展示了如何在J5上使用dsp进行任务处理。DSP示例包中包含CV示例和NN示例:
CV示例中封装了常见的cv api,并通过Sample介绍了各个api的使用方法。
NN示例中包含quantize、dequantize、softmax、pointpillar和centerpoint前处理算子api,并展示了示例用法。
各个示例主要分为arm侧和dsp侧两部分,其中arm侧负责准备数据然后发起rpc调用,dsp侧负责接收arm侧发来的任务,完成任务计算,将结果发送给arm。
开发者可以体验并基于该示例进行应用开发,降低开发门槛。
10.4.2. 交付物说明
交付物主要包括以下内容:
名称 |
内容 |
|---|---|
vdsp_rpc_sample |
包含示例源代码和运行脚本。 |
10.4.2.1. 示例代码包
示例包结构如下所示:
+---vdsp_rpc_sample
├── arm                                          # arm侧
│   ├── cv
│   │   ├── build_arm.sh                         # arm侧构建脚本
│   │   ├── CMakeLists.txt
│   │   ├── main.cc                              # main函数
│   │   └── src                                  # cv算子示例源文件目录
│   └── nn
│       ├── build_arm.sh                         # arm侧构建脚本
│       ├── CMakeLists.txt
│       ├── main.cc                              # main函数
│       └── src                                  # nn算子示例源文件目录
├── dsp
│   ├── build_dsp.sh                             # dsp侧构建脚本
│   ├── CMakeLists.txt
│   ├── src                                      # dsp算子实现目录
│   └── main.cc                                  # dsp侧镜像源文件
├── script
│   ├── cv
│   │   ├── run_cv_test.sh                       # 运行示例脚本
│   │   ├── bin                                  # 可执行程序目录
│   │   └── data                                 # 图像目录
│   ├── nn
│   │   ├── run_nn_test.sh
│   │   ├── bin                                  # 可执行程序目录
│   │   ├── model                                # 模型目录
│   │   └── data                                 # 图像目录
│   ├── image
│   ├── lib
│   └── dsp_deploy.sh                            # dsp镜像部署脚本
├── deps
│   ├── aarch64                                  # arm侧库目录
│   └── vdsp                                     # dsp侧库目录
└── README.md
arm:arm侧示例,封装了常用api,主要负责发起RPC调用,接收dsp处理结果。
cv:cv示例,包含了图片处理的cv算子示例。在当前示例中,输入图片input.jpg的stride属性等于width属性的字节长度。
nn:nn示例,包含quantize和dequantize api,自定义算子softmax,pointpillar和centerpoint前处理。
dsp:dsp侧示例,实现了dsp算子功能,主要负责接收arm侧发来的任务,完成softmax等算子的计算,将结果发送给arm。
src:包含quantize和dequantize api,以及自定义算子softmax,pointpillar和centerpoint前处理的dsp侧实现。
script:示例的生成文件及脚本目录。
cv:包含cv示例的可执行文件、输入数据及执行脚本。
nn:包含nn示例的可执行文件、输入数据、模型及执行脚本。
image: DSP镜像目录。
lib: 可执行程序的依赖库目录。
deps:所有示例的依赖文件目录。
aarch64:arm侧的依赖目录。
vdsp:dsp侧的依赖目录。
10.4.3. 环境构建
10.4.3.1. 开发板准备
拿到开发板后,按照 系统镜像升级 中的说明,升级系统镜像到示例包推荐的系统镜像版本。
确保本地开发机和开发板可以远程连接。
10.4.3.2. 编译
10.4.3.2.1. ARM侧编译
编译需要当前环境安装好交叉编译工具gcc-ubuntu-9.3.0-2020.03-x86_64-aarch64-linux-gnu。
设置环境变量 LINARO_GCC_ROOT 为交叉编译工具的实际安装位置:
export LINARO_GCC_ROOT=/opt/gcc-ubuntu-9.3.0-2020.03-x86_64-aarch64-linux-gnu
10.4.3.2.1.1. 编译CV示例
执行 vdsp_rpc_sample/arm/cv 目录下的build_arm.sh即可编译真机环境下的可执行程序,可执行程序和对应依赖会自动复制到 vdsp_rpc_sample/script/cv 目录下。
10.4.3.2.1.2. 编译NN示例
执行 vdsp_rpc_sample/arm/nn 目录下的build_arm.sh即可编译真机环境下的可执行程序,可执行程序和对应依赖会自动复制到 vdsp_rpc_sample/script/nn 目录下。
10.4.3.2.2. DSP侧编译
可从地平线获取 Xplorer-9.0.17-linux-x64-installer.bin 和 vdsp_vp6_RI4_linux-21.7.tgz 安装包。安装及配置方法请参考 安装DSP工具链及配置核 章节。
执行 vdsp_rpc_sample/dsp 目录下的 build_dsp.sh 脚本即可一键编译dsp镜像到 vdsp_rpc_sample/script/image 目录下。
10.4.4. 示例使用
10.4.4.1. DSP侧
推荐您运行dsp_deploy.sh部署dsp镜像,也可以参考如下命令启动:
准备一块J5开发板,设置dsp镜像名称,可以先通过以下命令确认镜像名称是否需要重设:
cat /sys/class/remoteproc/remoteproc1/firmware
cat /sys/class/remoteproc/remoteproc2/firmware
若镜像名称不是vdsp0和vdsp1,则重新设置dsp镜像名称,命令为:
echo vdsp0 > /sys/class/remoteproc/remoteproc1/firmware
echo vdsp1 > /sys/class/remoteproc/remoteproc2/firmware
停止dsp运行,停止命令为:
echo stop > /sys/class/remoteproc/remoteproc1/state (停止vdsp0)
echo stop > /sys/class/remoteproc/remoteproc2/state (停止vdsp1)
停止成功后,将 vdsp_rpc_sample/script/image 目录下编译出来的两个镜像vdsp0和vdsp1拷贝到J5开发板上替换掉 /system/lib/firmware/ 目录下的vdsp0和vdsp1。
注解
1.若dsp核处于stop状态下,执行上述命令会报错,但可以忽略;
2.加密板子需要更换目录的权限之后才能够替换镜像,具体方法可以参照下文中的示例。
重新启动dsp镜像,命令为:
echo start > /sys/class/remoteproc/remoteproc1/state (启动vdsp0)
echo start > /sys/class/remoteproc/remoteproc2/state (启动vdsp1)
注解
在替换新的dsp镜像前一定要先卸载正在运行的dsp镜像,替换完镜像后最好重新启动系统。
在上述步骤中,若开发板是加密板子则 /system/lib/firmware/ 目录是不允许修改的,此时需要采取其他方法实现替换vdsp镜像的目的,下面介绍两种方法,若用户有其他方法也可自行实施。
方法一,使用mount指令把自定义路径挂载到系统路径。
#!/bin/sh
set -x
# 解除默认镜像路径的其他挂载
umount /system/lib/firmware
rm -rf /tmp_vdsp
# 创建自定义的镜像目录
mkdir -p /tmp_vdsp/
chmod -R 777 /tmp_vdsp
# 保留默认镜像路径的内容
cp -r /system/lib/firmware /tmp_vdsp/
# 将自定义目录挂载到默认路径下
mount /tmp_vdsp/firmware /system/lib/firmware
# 停止dsp镜像
echo stop > /sys/class/remoteproc/remoteproc1/state
echo stop > /sys/class/remoteproc/remoteproc2/state
# 重新设置dsp镜像名称
echo vdsp0 > /sys/class/remoteproc/remoteproc1/firmware
echo vdsp1 > /sys/class/remoteproc/remoteproc2/firmware
# 拷贝编译好的镜像到自定义目录
cp image/* /tmp_vdsp/firmware/
# 启动dsp镜像
echo start > /sys/class/remoteproc/remoteproc1/state
echo start > /sys/class/remoteproc/remoteproc2/state
方法二,修改dsp镜像路径的配置。
#!/bin/sh
set -x
# 停止dsp镜像
echo stop > /sys/class/remoteproc/remoteproc1/state
echo stop > /sys/class/remoteproc/remoteproc2/state
# 修改Firmware配置路径
echo -n "/tmp_vdsp/image/" > /sys/module/firmware_class/parameters/path
# 重新设置dsp镜像名称
echo vdsp0 > /sys/class/remoteproc/remoteproc1/firmware
echo vdsp1 > /sys/class/remoteproc/remoteproc2/firmware
# 启动dsp镜像
echo start > /sys/class/remoteproc/remoteproc1/state
echo start > /sys/class/remoteproc/remoteproc2/state
10.4.4.2. ARM侧
10.4.4.2.1. 运行CV示例
将 vdsp_rpc_sample/script 目录拷贝到J5开发板上,然后运行 script/cv 目录下的 run_cv_test.sh 脚本,RPC默认以中继模式运行(脚本在$PATH中加入 dsp_relay_server 所在路径)。
脚本会默认执行一遍所有cv算子的示例程序,用户也可以通过追加参数的形式指定需要执行的算子(可以通过在脚本中追加参数help来显示所有可执行算子)。
算子默认读取的图片路径为 data/input.jpg ,输出图片的路径为 output 。
root@j5dvb:/userdata/horizon/cv/script/cv# sh run_cv_test.sh
WARNING: Logging before InitGoogleLogging() is written to STDERR
I0404 10:04:19.854214 24161 test_bilateral_filter.cc:25] bilateralFilter begin
I0404 10:04:19.857084 24161 test_bilateral_filter.cc:37] read image data/input.jpg success
I0404 10:04:19.858124 24161 test_bilateral_filter.cc:78] rpc begin
[DSP] DSP version = 0.3.9
[A][DSP][initializer.cc:41](565978702) Init logger, level:3
[A][DSP][initializer.cc:56](565978702) Relay server mode
[I][DSP][engine.cc:496](565978703) Start thread for receive msg from relay server
I0404 10:04:19.862294 24161 test_bilateral_filter.cc:86] rpc finish
I0404 10:04:19.866811 24161 test_bilateral_filter.cc:91] write output image success
I0404 10:04:19.866986 24161 test_bilateral_filter.cc:95] bilateralFilter finish
I0404 10:04:19.867029 24161 test_box_filter.cc:26] boxFilter begin
I0404 10:04:19.869221 24161 test_box_filter.cc:38] read image data/input.jpg success
I0404 10:04:19.869432 24161 test_box_filter.cc:81] rpc begin
I0404 10:04:19.869954 24161 test_box_filter.cc:88] rpc finish
I0404 10:04:19.874073 24161 test_box_filter.cc:93] write output success
I0404 10:04:19.874294 24161 test_box_filter.cc:97] boxFilter finish
I0404 10:04:19.874387 24161 test_canny.cc:25] canny begin
I0404 10:04:19.876570 24161 test_canny.cc:37] read image data/input.jpg success
I0404 10:04:19.876847 24161 test_canny.cc:80] rpc begin
I0404 10:04:19.880090 24161 test_canny.cc:87] rpc finish
I0404 10:04:19.884655 24161 test_canny.cc:95] canny finish
I0404 10:04:19.884769 24161 test_cvt_color.cc:26] cvtColor RGB to Gray begin
I0404 10:04:19.887614 24161 test_cvt_color.cc:46] read image data/CornersR.pgm, data/CornersG.pgm, data/CornersB.pgm success
I0404 10:04:19.888602 24161 test_cvt_color.cc:95] rpc begin
I0404 10:04:19.889555 24161 test_cvt_color.cc:101] rpc finish
I0404 10:04:19.904153 24161 test_cvt_color.cc:106] write output success
I0404 10:04:19.904505 24161 test_cvt_color.cc:110] cvtColor RGB to Gray finish
I0404 10:04:19.904994 24161 test_cvt_color.cc:134] cvtColor RGB_NV12 begin
I0404 10:04:19.907721 24161 test_cvt_color.cc:154] read image data/CornersR.pgm, data/CornersG.pgm, data/CornersB.pgm success
I0404 10:04:19.908815 24161 test_cvt_color.cc:229] rpc begin
I0404 10:04:19.909670 24161 test_cvt_color.cc:235] rpc finish
I0404 10:04:19.913132 24161 test_cvt_color.cc:246] write output success
I0404 10:04:19.913479 24161 test_cvt_color.cc:251] cvtColor RGB_NV12 finish
I0404 10:04:19.913687 24161 test_cvt_color.cc:134] cvtColor BGR_NV12 begin
I0404 10:04:19.915851 24161 test_cvt_color.cc:154] read image data/CornersR.pgm, data/CornersG.pgm, data/CornersB.pgm success
I0404 10:04:19.916833 24161 test_cvt_color.cc:229] rpc begin
I0404 10:04:19.917603 24161 test_cvt_color.cc:235] rpc finish
I0404 10:04:19.920951 24161 test_cvt_color.cc:246] write output success
I0404 10:04:19.921289 24161 test_cvt_color.cc:251] cvtColor BGR_NV12 finish
I0404 10:04:19.921495 24161 test_dilate.cc:24] dilate begin
I0404 10:04:19.923640 24161 test_dilate.cc:36] read image data/input.jpg success
I0404 10:04:19.923928 24161 test_dilate.cc:96] rpc begin
I0404 10:04:19.924516 24161 test_dilate.cc:103] rpc finish
I0404 10:04:19.928915 24161 test_dilate.cc:108] write output success
I0404 10:04:19.929147 24161 test_dilate.cc:113] dilate finish
I0404 10:04:19.929186 24161 test_equalize_hist.cc:24] equalizeHist begin
I0404 10:04:19.931283 24161 test_equalize_hist.cc:36] read image data/input.jpg success
I0404 10:04:19.931493 24161 test_equalize_hist.cc:71] rpc begin
I0404 10:04:19.932061 24161 test_equalize_hist.cc:79] rpc finish
I0404 10:04:19.936277 24161 test_equalize_hist.cc:84] write output success
I0404 10:04:19.936441 24161 test_equalize_hist.cc:88] equalizeHist finish
I0404 10:04:19.936483 24161 test_erode.cc:24] erode begin
I0404 10:04:19.938597 24161 test_erode.cc:36] read image data/input.jpg success
I0404 10:04:19.938856 24161 test_erode.cc:97] rpc begin
I0404 10:04:19.939402 24161 test_erode.cc:104] rpc finish
I0404 10:04:19.943722 24161 test_erode.cc:109] write output success
I0404 10:04:19.944020 24161 test_erode.cc:114] erode finish
I0404 10:04:19.944062 24161 test_filter2D.cc:24] filter2D begin
I0404 10:04:19.946146 24161 test_filter2D.cc:36] read image data/input.jpg success
I0404 10:04:19.946403 24161 test_filter2D.cc:103] rpc begin
I0404 10:04:19.946970 24161 test_filter2D.cc:111] rpc finish
I0404 10:04:19.950825 24161 test_filter2D.cc:116] write output success
I0404 10:04:19.951031 24161 test_filter2D.cc:121] filter2D finish
I0404 10:04:19.951072 24161 test_flip.cc:26] flip begin
I0404 10:04:19.951404 24161 test_flip.cc:42] read image data/500x480.lena.yuv success
I0404 10:04:19.952016 24161 test_flip.cc:95] rpc begin
I0404 10:04:19.952658 24161 test_flip.cc:101] rpc finish
I0404 10:04:19.955663 24161 test_flip.cc:111] write output success
I0404 10:04:19.956105 24161 test_flip.cc:117] flip finish
I0404 10:04:19.956148 24161 test_gaussian_blur.cc:24] gaussianBlur begin
I0404 10:04:19.958269 24161 test_gaussian_blur.cc:36] read image data/input.jpg success
I0404 10:04:19.958498 24161 test_gaussian_blur.cc:77] rpc begin
I0404 10:04:19.958981 24161 test_gaussian_blur.cc:86] rpc finish
I0404 10:04:19.962965 24161 test_gaussian_blur.cc:91] write output success
I0404 10:04:19.963131 24161 test_gaussian_blur.cc:95] gaussianBlur finish
I0404 10:04:19.963173 24161 test_integral.cc:26] integral begin
I0404 10:04:19.965351 24161 test_integral.cc:38] read image data/input.jpg success
I0404 10:04:19.965561 24161 test_integral.cc:73] rpc begin
I0404 10:04:19.966217 24161 test_integral.cc:79] rpc finish
I0404 10:04:19.969887 24161 test_integral.cc:84] write output success
I0404 10:04:19.970073 24161 test_integral.cc:88] integral finish
I0404 10:04:19.970114 24161 test_median_blur.cc:24] medianBlur begin
I0404 10:04:19.972227 24161 test_median_blur.cc:36] read image data/input.jpg success
I0404 10:04:19.972437 24161 test_median_blur.cc:74] rpc begin
I0404 10:04:19.973016 24161 test_median_blur.cc:83] rpc finish
I0404 10:04:19.977061 24161 test_median_blur.cc:88] write output success
I0404 10:04:19.977222 24161 test_median_blur.cc:92] medianBlur finish
I0404 10:04:19.977264 24161 test_pyr_down.cc:27] pyrDown begin
I0404 10:04:19.977563 24161 test_pyr_down.cc:43] read image data/500x480.lena.yuv success
I0404 10:04:19.978075 24161 test_pyr_down.cc:91] rpc begin
I0404 10:04:19.978708 24161 test_pyr_down.cc:96] rpc finish
I0404 10:04:19.979758 24161 test_pyr_down.cc:106] write output success
I0404 10:04:19.980124 24161 test_pyr_down.cc:112] pyrDown finish
I0404 10:04:19.980166 24161 test_pyr_up.cc:28] pyrUp begin
I0404 10:04:19.980435 24161 test_pyr_up.cc:44] read image data/500x480.lena.yuv success
I0404 10:04:19.980849 24161 img_util.cc:192] crop roi left: 0, top: 0, right: 499, bottom: 479
I0404 10:04:19.980892 24161 test_pyr_up.cc:79] crop roi area success
I0404 10:04:19.981042 24161 test_pyr_up.cc:103] rpc begin
I0404 10:04:19.981946 24161 test_pyr_up.cc:108] rpc finish
I0404 10:04:19.993014 24161 test_pyr_up.cc:117] write output success
I0404 10:04:19.993606 24161 test_pyr_up.cc:123] pyrUp finish
I0404 10:04:19.993654 24161 test_resize.cc:25] resize begin
I0404 10:04:19.993976 24161 test_resize.cc:41] read image data/500x480.lena.yuv success
I0404 10:04:19.994436 24161 img_util.cc:192] crop roi left: 200, top: 200, right: 359, bottom: 419
I0404 10:04:19.994479 24161 test_resize.cc:77] crop roi area success
I0404 10:04:19.994621 24161 test_resize.cc:106] rpc begin
I0404 10:04:19.995270 24161 test_resize.cc:113] rpc finish
I0404 10:04:19.996778 24161 test_resize.cc:123] write output success
I0404 10:04:19.997079 24161 test_resize.cc:129] resize finish
I0404 10:04:19.997120 24161 test_roi_resize.cc:25] roi resize begin
I0404 10:04:19.997393 24161 test_roi_resize.cc:41] read image data/500x480.lena.yuv success
I0404 10:04:19.997918 24161 test_roi_resize.cc:103] rpc begin
I0404 10:04:19.998629 24161 test_roi_resize.cc:111] rpc finish
I0404 10:04:20.001219 24161 test_roi_resize.cc:121] write output success
I0404 10:04:20.001536 24161 test_roi_resize.cc:127] roi resize finish
I0404 10:04:20.001740 24161 test_rotate.cc:25] rotate begin
I0404 10:04:20.002033 24161 test_rotate.cc:41] read image data/500x480.lena.yuv success
I0404 10:04:20.002566 24161 img_util.cc:192] crop roi left: 200, top: 200, right: 359, bottom: 419
I0404 10:04:20.002610 24161 test_rotate.cc:75] crop roi area success
I0404 10:04:20.002749 24161 test_rotate.cc:105] rpc begin
I0404 10:04:20.003302 24161 test_rotate.cc:112] rpc finish
I0404 10:04:20.004119 24161 test_rotate.cc:122] write output success
I0404 10:04:20.004400 24161 test_rotate.cc:128] rotate finish
I0404 10:04:20.004439 24161 test_sep_filter2D.cc:24] sepFilter2D begin
I0404 10:04:20.006723 24161 test_sep_filter2D.cc:36] read image data/input.jpg success
I0404 10:04:20.007028 24161 test_sep_filter2D.cc:113] rpc begin
I0404 10:04:20.007557 24161 test_sep_filter2D.cc:126] rpc finish
I0404 10:04:20.011672 24161 test_sep_filter2D.cc:131] write output success
I0404 10:04:20.011984 24161 test_sep_filter2D.cc:137] sepFilter2D finish
I0404 10:04:20.012029 24161 test_sobel.cc:26] sobel begin
I0404 10:04:20.014138 24161 test_sobel.cc:38] read image data/input.jpg success
I0404 10:04:20.014354 24161 test_sobel.cc:81] rpc begin
I0404 10:04:20.014945 24161 test_sobel.cc:88] rpc finish
I0404 10:04:20.019804 24161 test_sobel.cc:93] write output success
I0404 10:04:20.020040 24161 test_sobel.cc:97] sobel finish
I0404 10:04:20.020081 24161 test_threshold.cc:26] threshold begin
I0404 10:04:20.022189 24161 test_threshold.cc:38] read image data/input.jpg success
I0404 10:04:20.022398 24161 test_threshold.cc:78] rpc begin
I0404 10:04:20.022874 24161 test_threshold.cc:85] rpc finish
I0404 10:04:20.026901 24161 test_threshold.cc:90] write output success
I0404 10:04:20.027076 24161 test_threshold.cc:94] threshold finish
I0404 10:04:20.027117 24161 test_transpose.cc:25] transpose begin
I0404 10:04:20.027387 24161 test_transpose.cc:41] read image data/500x480.lena.yuv success
I0404 10:04:20.028016 24161 test_transpose.cc:91] rpc begin
I0404 10:04:20.028723 24161 test_transpose.cc:97] rpc finish
I0404 10:04:20.031723 24161 test_transpose.cc:107] write output success
I0404 10:04:20.032124 24161 test_transpose.cc:113] transpose finish
I0404 10:04:20.032166 24161 test_warp_affine.cc:74] warpAffine begin
I0404 10:04:20.032438 24161 test_warp_affine.cc:90] read image data/500x480.lena.yuv success
I0404 10:04:20.032955 24161 test_warp_affine.cc:170] rpc begin
I0404 10:04:20.034016 24161 test_warp_affine.cc:179] rpc finish
I0404 10:04:20.037031 24161 test_warp_affine.cc:189] write output success
I0404 10:04:20.037367 24161 test_warp_affine.cc:195] warpAffine finish
I0404 10:04:20.037408 24161 test_warp_perspective.cc:26] warpPerspective begin
I0404 10:04:20.037680 24161 test_warp_perspective.cc:42] read image data/500x480.lena.yuv success
I0404 10:04:20.038198 24161 test_warp_perspective.cc:100] rpc begin
I0404 10:04:20.039664 24161 test_warp_perspective.cc:111] rpc finish
I0404 10:04:20.042690 24161 test_warp_perspective.cc:122] write output success
I0404 10:04:20.043009 24161 test_warp_perspective.cc:128] warpPerspective finish
I0404 10:04:20.043051 24161 test_corner_harris.cc:25] cornerHarris begin
I0404 10:04:20.043300 24161 test_corner_harris.cc:37] read image data/cornerharris_128_128.pgm success
I0404 10:04:20.043470 24161 test_corner_harris.cc:78] rpc begin
I0404 10:04:20.044196 24161 test_corner_harris.cc:87] rpc finish
I0404 10:04:20.045856 24161 test_corner_harris.cc:95] cornerharris finish
I0101 08:50:46.706284  1814 test_remap.cc:54] remap begin
I0101 08:50:46.708468  1814 test_remap.cc:66] read image data/input.jpg success
I0101 08:50:46.709733  1814 test_remap.cc:129] rpc begin
I0101 08:50:46.710690  1814 test_remap.cc:138] rpc finish
I0101 08:50:46.715012  1814 test_remap.cc:148] remap finish
10.4.4.2.2. 运行NN示例
将 vdsp_rpc_sample/script 目录拷贝到J5开发板上,然后运行 script/nn 目录下的 run_nn_test.sh 脚本 ,
RPC默认以中继模式运行(脚本在$PATH加入 dsp_relay_server 所在路径)。
为了测试DNN plugin功能,脚本中添加环境变量 HB_DNN_PLUGIN_PATH ,变量指向libhb_dsp_nn_plugin.so路径,并添加 export HB_DNN_ENABLE_DSP=1 使能DNN将算子派发到DSP上执行。
脚本会执行一次NN示例,包括quantize示例、dequantize示例、softmax示例、pointpillar和centerpoint前处理示例、以及mobilentv1的推理任务,输出top5的分类,
用户也可以通过追加参数的形式指定需要执行的算子(可以通过在脚本中追加参数help来显示所有可执行算子)。
pointpillar和centerpoint前处理算子默认从 data 目录获取点云数据,您可以通过命令行参数来指定点云数据的路径。
处理后的数据将被转储到 output 路径中。
root@j5dvb:/userdata/horizon/cv/script/nn# sh run_nn_test.sh
I0000 00:00:00.000000 27751 vlog_is_on.cc:197] RAW: Set VLOG level for "*" to 3
I0204 18:03:56.940730 27751 test_quantize.cc:51] quantize begin
I0204 18:03:56.979334 27751 test_quantize.cc:112] rpc begin
[DSP] DSP version = 0.3.24
[A][DSP]initializer.cc:41][[02-04][18:03:56:979:792]] Init logger, level:3
[A][DSP]initializer.cc:56][[02-04][18:03:56:979:861]] Relay server mode
[DSP] DSP version = 0.3.24
[A][DSP]initializer.cc:41][[02-04][18:03:56:986:788]] Init logger, level:3
[I][DSP][initializer.cc:156][[02-04][18:03:56:987:65]] Init relay server
[I][DSP][engine.cc:653][[02-04][18:03:56:987:267]] Start thread for receive msg from relay client
[I][DSP][client.cc:26][[02-04][18:03:56:987:474]] Connect to vdsp core0...
[I][DSP][client.cc:50][[02-04][18:03:56:987:577]] Connect to vdsp core0 success!
[I][DSP][client.cc:26][[02-04][18:03:56:987:801]] Connect to vdsp core1...
[I][DSP][engine.cc:589][[02-04][18:03:56:987:752]] Start thread for receive msg from relay server
[I][DSP][engine.cc:256][[02-04][18:03:56:987:761]] Start thread for receive msg from vdsp0
[I][DSP][client.cc:50][[02-04][18:03:56:987:963]] Connect to vdsp core1 success!
[I][DSP][engine.cc:256][[02-04][18:03:56:988:168]] Start thread for receive msg from vdsp1
[I][DSP][engine.cc:152][[02-04][18:03:56:988:356]] Start thread for send msg to vdsp
I0204 18:03:56.990144 27751 test_quantize.cc:119] rpc finish
I0204 18:03:56.992954 27751 test_quantize.cc:127] check result right
I0204 18:03:56.993538 27751 test_quantize.cc:137] quantize finish
I0204 18:03:56.993578 27751 test_dequantize.cc:56] dequantize begin
I0204 18:03:57.038347 27751 test_dequantize.cc:118] rpc begin
I0204 18:03:57.040205 27751 test_dequantize.cc:127] rpc finish
I0204 18:03:57.052908 27751 test_dequantize.cc:135] check result right
I0204 18:03:57.054844 27751 test_dequantize.cc:145] dequantize finish
I0204 18:03:57.054891 27751 test_softmax.cc:21] softmax begin
[W][DNN]layer_registry.cpp:25][Layer](2024-02-04,18:03:57.54.947) layer Softmax has been registered.
I0204 18:03:57.055029 27751 test_softmax.cc:26] hbDNNRegisterLayerCreator success
[BPU_PLAT]BPU Platform Version(1.3.5)!
[HBRT] set log level as 0. version = 3.15.40.0
[A][DNN][configuration.cpp:270][Util](2024-02-04,18:03:57.223.18) Run Quantize and Dequantize on DSP
[DNN] Runtime version = 1.22.6_(3.15.40 HBRT)
[A][DNN][packed_model.cpp:246][Model](2024-02-04,18:03:57.344.492) [HorizonRT] The model builder version = 1.20.1
[W][DNN]bpu_model_info.cpp:498][Version](2024-02-04,18:03:57.381.275) Model: mobilenetv1_224x224_nv12. Inconsistency between the hbrt library version 3.15.40.0 and the model build version 3.15.34.0 detected, in order to ensure correct model results, it is recommended to use compilation tools and the BPU SDK from the same OpenExplorer package.
I0204 18:03:57.384804 27751 test_softmax.cc:41] hbDNNGetModelNameList success
I0204 18:03:57.384874 27751 test_softmax.cc:48] hbDNNGetModelHandle success
I0204 18:03:57.414289 27751 test_softmax.cc:57] read image to nv12 success
I0204 18:03:57.414515 27751 test_softmax.cc:67] prepare nv12 tensor success
I0204 18:03:57.414633 27751 test_softmax.cc:78] prepare tensor success
I0204 18:03:57.414871 27751 test_softmax.cc:88] hbDNNInfer success
I0204 18:03:57.418025 27751 test_softmax.cc:93] task done
I0204 18:03:57.418164 27751 test_softmax.cc:98] task post process success
I0204 18:03:57.418205 27751 test_softmax.cc:104] TOP 0 result id: 340
I0204 18:03:57.418231 27751 test_softmax.cc:104] TOP 1 result id: 292
I0204 18:03:57.418256 27751 test_softmax.cc:104] TOP 2 result id: 282
I0204 18:03:57.418280 27751 test_softmax.cc:104] TOP 3 result id: 83
I0204 18:03:57.418303 27751 test_softmax.cc:104] TOP 4 result id: 290
I0204 18:03:57.419497 27751 test_softmax.cc:119] softmax finish
I0204 18:03:57.419541 27751 test_softmax_op.cc:29] softmax op begin
I0204 18:03:57.428498 27751 test_softmax_op.cc:71] softmax op finish
I0204 18:03:57.428537 27751 test_centerpoint_preprocess.cc:78] centerpoint preprocess begin
I0204 18:03:57.429078 27751 pointpillar_common.cc:33] fetch binary from data/49f8376cd6b34f07b20ed6d5b5b42acd.bin
I0204 18:03:57.465303 27751 test_centerpoint_preprocess.cc:131] point count:  300000
I0204 18:03:57.466442 27751 test_centerpoint_preprocess.cc:188] stage 1 rpc begin
I0204 18:03:57.471974 27751 test_centerpoint_preprocess.cc:198] dsp 1 time 5.604ms
I0204 18:03:57.472054 27751 test_centerpoint_preprocess.cc:201] gen voxel data begin
I0204 18:03:57.480768 27751 test_centerpoint_preprocess.cc:216] gen voxel data finish
I0204 18:03:57.480846 27751 test_centerpoint_preprocess.cc:219] cpu time 8.88 ms
I0204 18:03:57.480898 27751 test_centerpoint_preprocess.cc:222] stage 2 rpc begin
I0204 18:03:57.482786 27751 test_centerpoint_preprocess.cc:234] stage 2 rpc finish
I0204 18:03:57.482828 27751 test_centerpoint_preprocess.cc:238] dsp 2 time 1.982 ms
I0204 18:03:57.482867 27751 test_centerpoint_preprocess.cc:241] total time 16.467 ms
I0204 18:03:57.483108 27751 pointpillar_common.cc:47] dump coords to output/centerpoint_preprocess_coords_dsp.txt
I0204 18:03:57.546213 27751 pointpillar_common.cc:57] dump features to output/centerpoint_preprocess_features_dsp.txt
I0204 18:03:59.062077 27751 test_centerpoint_preprocess.cc:253] pointpillar preprocess finish
I0204 18:03:59.062333 27751 test_pointpillar_preprocess.cc:360] pointpillar preprocess begin
I0204 18:03:59.062539 27751 pointpillar_common.cc:33] fetch binary from data/000001_1_150000_1_150000.bin
I0204 18:03:59.127831 27751 test_pointpillar_preprocess.cc:409] point count:  100000
I0204 18:03:59.128545 27751 test_pointpillar_preprocess.cc:249] run pointpillar preprocess dsp begin
I0204 18:03:59.129304 27751 test_pointpillar_preprocess.cc:293] stage 1 rpc begin
I0204 18:03:59.131621 27751 test_pointpillar_preprocess.cc:302] dsp 1 time 2.364ms
I0204 18:03:59.131680 27751 test_pointpillar_preprocess.cc:305] gen voxel data begin
I0204 18:03:59.134047 27751 test_pointpillar_preprocess.cc:320] gen voxel data finish
I0204 18:03:59.134086 27751 test_pointpillar_preprocess.cc:323] cpu time 2.47 ms
I0204 18:03:59.134131 27751 test_pointpillar_preprocess.cc:326] stage 2 rpc begin
I0204 18:03:59.136258 27751 test_pointpillar_preprocess.cc:338] stage 2 rpc finish
I0204 18:03:59.136294 27751 test_pointpillar_preprocess.cc:341] dsp 2 time 2.207 ms
I0204 18:03:59.136332 27751 test_pointpillar_preprocess.cc:344] total time 7.042 ms
I0204 18:03:59.136520 27751 pointpillar_common.cc:47] dump coords to output/pointpillar_preprocess_coords_dsp.txt
I0204 18:03:59.156057 27751 pointpillar_common.cc:57] dump features to output/pointpillar_preprocess_features_dsp.txt
I0204 18:04:01.467938 27751 test_pointpillar_preprocess.cc:355] run pointpillar preprocess dsp end
I0204 18:04:01.468166 27751 test_pointpillar_preprocess.cc:133] run pointpillar preprocess ref begin
I0204 18:04:01.540686 27751 pointpillar_common.cc:47] dump coords to output/pointpillar_preprocess_coords_ref.txt
I0204 18:04:01.560117 27751 pointpillar_common.cc:57] dump features to output/pointpillar_preprocess_features_ref.txt
I0204 18:04:03.871706 27751 test_pointpillar_preprocess.cc:190] run pointpillar preprocess ref end
I0204 18:04:03.876520 27751 test_pointpillar_preprocess.cc:437] pointpillar preprocess finish
10.4.5. CenterPoint点云前处理介绍
为了更好地帮助您理解DSP示例包提供的 CenterPoint 五维点云前处理,本文从算法原理出发,分析CPU和DSP参考实现,同时对CPU和DSP参考实现进行一致性校验和性能评测。示例包中同时也提供了 PointPillars 四维点云前处理,与 CenterPoint 类似,
两者前处理的主要特点是通过体素化生成柱体( pillars )。本章节主要介绍 CenterPoint 前处理实现,另外用单独的一节介绍 PointPillars 前处理在实现上的不同之处。
10.4.5.1. 原理介绍
本文使用五维 CenterPoint 模型作为示例介绍,其相应的原理和前处理算法实现也可适用于四维的 PointPillars 模型。模型的输入为五维点云数据,最大点数为30万。前处理主要由体素化,特征编码,量化和转置组成。前处理输出 1x5x20x40000(nchw) 的特征图和 1x1x40000x4(nhwc) 的坐标信息。

10.4.5.1.1. 体素化
根据输入的五维点云数据的 x , y 坐标计算出柱体的坐标,最大的柱体数目为 40000 ,每个柱体最大支持的点数为 20 。柱体坐标的计算原理如下:
判断点云的
x,y,z是否在有效的范围内,跳过无效的点云数据。点云的
x,y信息可以被视为伪图像,伪图像中的每一个像素对应一个柱体坐标。输入点云的坐标是无序的,因此需要按照坐标的输入顺序确定柱体坐标,当柱体数超过模型限制的最大值之后,不会生成新的柱体,而是将点写入到最后一个柱体中。
相同坐标的点会放入同一个柱体中,模型限制每一个柱体中点的数目,当超过最大限制时,则直接跳过该点。
体素化的伪代码实现如下所示:
cur_pillar_id = 0
max_pillar_id = 39999
max_pt_id_in_pillar = 19

for point_cloud in point_clouds:
  x = point_cloud[0]
  y = point_cloud[1]
  z = point_cloud[2]
  // 跳过无效的点云数据
  if x or y or z invalid:
    continue;

  // 计算点云输入x,y的伪图像坐标
  idx = (x - back) / x_scale
  idy = (y - right) / y_scale

  // 计算柱体坐标
  if pillars[{idx,idy}] not exist:
    if cur_pillar_id < max_pillar_id:
      pt_pillar_id = cur_pillar_id
      pillars[{idx,idy}] = cur_pillar_id
      cur_pillar_id += 1
    else:
      pillars[{idx,idy}] = max_pillar_id
      pt_pillar_id = max_pillar_id
  else:
    pt_pillar_id = pillars[{idx,idy}]

  // 计算点在柱体中的索引
  if pillar_nums[pt_pillar_id] < max_pt_id_in_pillar
    pt_id_in_pillar = pillar_nums[pt_pillar_id]
    pillar_nums[pt_pillar_id] += 1
  else
    pt_id_in_pillar = max_pt_id_in_pillar
10.4.5.1.2. 特征编码
点云数据的特征编码使用如下的公式:
10.4.5.1.3. 量化
量化的 scale 可以通过模型获取,使用以下公式完成量化:
10.4.5.1.4. 转置
模型输入的特征图 layout 模式为 NCHW ,转置将特征图的 shape 从 1x40000x20x5 转换为 1x5x20x40000。
10.4.5.2. CPU参考实现
CPU参考实现的源码位于 AI Benchmark 中,其前处理基本流程与原理介绍部分保持一致,其中量化合并到特征编码步骤中。
10.4.5.2.1. 体素化
void QATCenterPointPreProcessMethod::GenVoxel(int start, int end) {
  for (int i = start; i < end; i++) {
    float *point;
    point = point_cloud_data_ + i * config_->kdim;

    float &point_x = point[0];
    float &point_y = point[1];
    float &point_z = point[2];
    float &point_r = point[3];

    // 判断点云输入的x,y,z是否在有效范围内,跳过无效的点云数据
    if (point_x <= config_->kback_border || point_x >= config_->kfront_border ||
        point_y <= config_->kright_border || point_y >= config_->kleft_border ||
        point_z <= config_->kbottom_border || point_z >= config_->ktop_border) {
      continue;
    }

    // 计算伪图像坐标
    int idx = (point_x - config_->kback_border) / config_->kx_scale;
    int idy = (point_y - config_->kright_border) / config_->ky_scale;

    // 将伪图像坐标转换为一维索引,该索引作为key,判断点对应的
    // 柱体坐标是否已经设置过
    int pillar_index = idy * config_->kx_length + idx;
    int voxelidx = config_->coor_to_voxel_idx[pillar_index];
    // config_->coor_to_voxel_idx开始会初始化为-1
    // -1表示该点的柱体坐标没有设置过
    if (voxelidx == -1) {
      // 如果柱体数小于最大值,则更新柱体坐标,否则使用最大值
      if (voxel_num_ < config_->kmax_num_point) {
        voxelidx = voxel_num_;
        voxel_num_ += 1;
      } else {
        voxelidx = config_->kmax_num_point - 1;
      }
      // 更新柱体坐标
      config_->coor_to_voxel_idx[pillar_index] = voxelidx;

      // 写入柱体的坐标信息
      config_->coors[voxelidx * 4 + 1] = 0;
      config_->coors[voxelidx * 4 + 2] = idy;
      config_->coors[voxelidx * 4 + 3] = idx;
    }

    if (config_->pillar_point_num[voxelidx] >= config_->kmax_num_point_pillar) {
      continue;
    } else {
      // 根据点的柱体坐标和点在柱体中的索引,确定点云数据写入的位置
      auto total_offset = (config_->kmax_num_point_pillar * voxelidx +
                          config_->pillar_point_num[voxelidx]) *
                          config_->kdim;
      // 更新柱体中的点数
      config_->pillar_point_num[voxelidx] += 1;

      // 将点云数据写入到对应的柱体中
      *(voxel_data_ + total_offset) = point_x;
      *(voxel_data_ + total_offset + 1) = point_y;
      *(voxel_data_ + total_offset + 2) = point_z;
      *(voxel_data_ + total_offset + 3) = point_r;
      *(voxel_data_ + total_offset + 4) = point[4];
    }
  }
}
10.4.5.2.2. 特征编码 & 量化
void QATCenterPointPreProcessMethod::GenFeatureDim5(float scale) {
  for (int i = 0; i < voxel_num_; i++) {
    int idx = i * config_->kmax_num_point_pillar * config_->kdim;
    for (int j = 0; j < config_->kmax_num_point_pillar; ++j) {
      if (config_->pillar_point_num[i] >
          config_->kmax_num_point_pillar_vec[j]) {
        int index = idx + j * config_->kdim;
        // 特征编码 & 量化
        voxel_data_[index + 0] =
            (voxel_data_[index + 0] - config_->kback_border) /
            config_->kx_range / scale;
        voxel_data_[index + 1] =
            (voxel_data_[index + 1] - config_->kright_border) /
            config_->ky_range / scale;
        voxel_data_[index + 2] =
            (voxel_data_[index + 2] - config_->kbottom_border) /
            config_->kz_range / scale;
        voxel_data_[index + 3] = (voxel_data_[index + 3] - config_->kr_lower) /
                                config_->kr_range / scale;
        if (voxel_data_[index + 4] != 0) {
          voxel_data_[index + 4] = voxel_data_[index + 4] / scale;
        }
      }
    }
  }
}
10.4.5.2.3. 转置
// 浮点数采用TONEAREST的round模式
static inline float round(float const input) {
  std::fesetround(FE_TONEAREST);
  float const result{std::nearbyintf(input)};
  return result;
}

void QATCenterPointPreProcessMethod::TransposeDim5() {
  // 1x40000x20x5 -> 1x5x20x40000
  int kWC = config_->kmax_num_point_pillar * config_->kdim;
  int kHW = config_->kmax_num_point * config_->kmax_num_point_pillar;
  for (int c = 0; c < config_->kdim; ++c) {
    for (int w = 0; w < config_->kmax_num_point_pillar; ++w) {
      for (int h = 0; h < voxel_num_; ++h) {
        int old_index = h * kWC + w * config_->kdim + c;
        int new_index = c * kHW + w * config_->kmax_num_point + h;
        float features_tmp = round(static_cast<float>(voxel_data_[old_index]));
        // 将特征数据范围限制到量化后的[-128.0f, 127.0f]
        features_tmp = std::min(std::max(features_tmp, -128.0f), 127.0f);
        features_s8_[new_index] = static_cast<int8_t>(features_tmp);
      }
    }
  }
}
10.4.5.3. DSP加速思路
主要从两个方面考虑算子在DSP上的加速实现,第一是算子的计算部分, J5上的DSP支持 512bit 的 SIMD ,因此将计算部分尽可能向量化可以充分利用DSP的算力。第二是算子的访存部分,J5上的DSP有两个 128kB 的 TCM ,其访存性能接近CPU上的cache,因此将数据尽可能搬移到 TCM上 ,能有效地节约访存的开销。同时DSP也提供向量化的访存指令,也可以提高访存的效率。
10.4.5.3.1. 向量化
对于五维模型,可以将计算过程分为5个 cycle ,每个 cycle 计算一个维度,使用 IVP 向量指令完成运算。
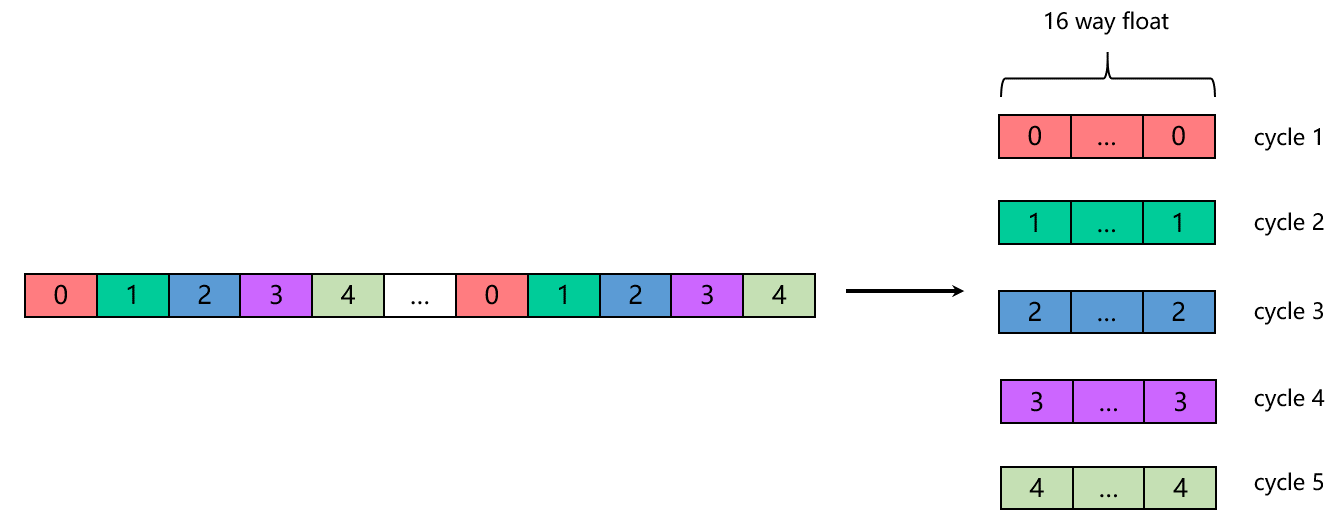
具体到 CenterPoint 点云前处理算法,在计算伪图像的坐标,特征编码以及量化等计算过程,都可以将每个维度独立计算,因此很容易转换成向量化的计算。
10.4.5.3.2. 访存优化
点云输入数据从 x , y 维度来看是无序的,导致计算出的柱体坐标和柱体中点的索引也是无序的,从而导致访存是随机而不是效率更高的顺序操作。由于DSP上没有 data cache ,随机访存非常不友好,因此需要充分利用DSP上的 TCM 。DSP上可用的 TCM 只有两个 128kB ,而特征数据输出的地址空间为 40000x20=781.25kB ,远大于 TCM 的内存大小。同时计算体素坐标时,也需要一个伪图像坐标与柱体坐标的查找表,该表所需的内存为 512x512x4=1MB ( 512 为伪图像的宽和高, 4 为柱体坐标所需的字节数),也是远远超出 TCM 的内存大小。考虑到将随机访存搬移到DSP代价太大,因此将前处理算法中的计算和访存进行分离,计算部分放到DSP上,而把部分随机访存放到CPU上执行。
同时为了减少访存的数据量,DSP加速实现调整了CPU实现的步骤,将特征编码和量化提前到计算伪图像坐标之后。通过这样的处理,后续的体素化和转置步骤访存所需的数据量将大大减少。
虽然这会增加更多的计算量,但是通过实际评测可见,减少访存数据量带来的收益会更大,特别是在有效点云数较大的情况下。
10.4.5.3.3. 分块策略
虽然有两个128kB的 TCM ,但是每一个计算周期只使用其中一个,原因主要有以下两个:
需要使用
Pingpong buffer,减少等待数据拷贝完成的时间Pingpong buffer需要位于不同的TCM中,减少data bank conflict
DSP上的计算被拆为两个部分,一个是计算伪图像坐标,特征编码和量化,另一个是转置。
计算伪图像坐标,特征编码和量化
每个计算周期,输入为五维点云数据( float32_t ),输出为伪图像坐标( int32_t ),量化后的 xyzr 维数据( int32_t )以及量化后加 padding 的 t 维数据( int32_t ),输入与输出比为 5:3 ,因此输入与输出的 TCM 内存大小比例也为 5:3 。当前可用于算子的 TCM 内存大小为 103kB ,考虑到内存管理元数据的内存占用和内存对齐, TCM 总共占用 80kB ,其中输入为 50kB ,输出为 30kB 。
转置
每个计算周期,输入为量化后的五维特征数据,输出为量化后的单维度特征数据,输入与输出比为 5:1 。因此输入 TCM 分配 75kB ,输出 TCM 分配为 15kB 。
10.4.5.4. DSP参考优化实现
DSP的 IVP 指令可以参考 Cadence 提供的文档 vdsp_vp6_RI4/html/ISA/NewISAhtml/index.html ,TCM内存管理接口的详细介绍可以参考 Xtensa Vision Tile Manager Library User’s Guide ,IDMA相关接口详细介绍可以参考 Xtensa System Software Reference Manual 。
10.4.5.4.1. 伪图像坐标计算,特征编码和转置(DSP计算部分)
伪图像坐标计算与CPU参考实现方法基本一致,主要区别有以下几点:
去掉一维坐标的计算,通过32位的高低16位存储伪图像
x和y坐标(示例模型伪图像的宽高为512,16位已足够存储),同时以二维坐标作为索引,用于查找对应的柱体坐标。在过滤无效的点云数据时,使用
mask move取代条件判断语句。因为在内循环中使用条件判断会明显降低运算性能。
static FORCE_INLINE void gen_feature_kernel(
    TileBuffer *input,
    TileBuffer *coords,
    xb_vecN_2x32Uv const *offset,
    xb_vecN_2xf32 const *sub,
    xb_vecN_2xf32 const *div,
    xb_vecN_2x32Uv id_offset,
    xb_vecN_2x32Uv xyzr_offset,
    xb_vecN_2x32Uv t_offset,
    hbDSPPointPillarPreProcessParam const *param) {
  valign a_store = IVP_ZALIGN();

  float32_t const *__restrict p_input = NULL;
  xb_vecN_2x32v *__restrict p_output =
      (xb_vecN_2x32v * __restrict) coords->tile_buffer;
  valign a_store = IVP_ZALIGN();

  // 根据SIMD的数据长度和输入维度计算每个周期处理的数据大小
  int32_t const in_data_per_cycle = (XCHAL_IVPN_SIMD_WIDTH / 2) * k_dim;
  int32_t const out_data_per_cycle = in_data_per_cycle * 3 / k_dim;

  int32_t data_width = input->data_size / (in_data_per_cycle * sizeof(float32_t));
  if ((input->data_size % (in_data_per_cycle * sizeof(float32_t)) != 0) ||
      data_width == 0) {
    ++data_width;
  }

  float32_t const *__restrict p_input =
      (float32_t const *__restrict)input->tile_buffer;
  int32_t const *__restrict p_output =
      (int32_t const *__restrict)output->tile_buffer;

  float32_t const x_scale = param->x_scale;
  float32_t const y_scale = param->y_scale;
  float32_t const scale = param->scale;

  for (int32_t i = 0; i < data_width; ++i) {
    // 使用gather指令分别加载五维输入到单个维度中
    xb_gsr gs = IVP_GATHERAN_2XF32(p_input, offset[0]);
    xb_vecN_2xf32 point_x = IVP_GATHERDN_2XF32(gs);

    gs = IVP_GATHERAN_2XF32(p_input, offset[1]);
    xb_vecN_2xf32 point_y = IVP_GATHERDN_2XF32(gs);

    gs = IVP_GATHERAN_2XF32(p_input, offset[2]);
    xb_vecN_2xf32 point_z = IVP_GATHERDN_2XF32(gs);

    gs = IVP_GATHERAN_2XF32(p_input, offset[3]);
    xb_vecN_2xf32 const point_r = IVP_GATHERDN_2XF32(gs);

    gs = IVP_GATHERAN_2XF32(p_input, offset[4]);
    xb_vecN_2xf32 const point_t = IVP_GATHERDN_2XF32(gs);

    // 使用IVP指令计算伪图像坐标
    xb_vecN_2xf32 const vf_idx =
        IVP_DIVN_2XF32(IVP_SUBN_2XF32(point_x, (xb_vecN_2xf32)param->back),
                      (xb_vecN_2xf32)x_scale);
    xb_vecN_2xf32 const vf_idy =
        IVP_DIVN_2XF32(IVP_SUBN_2XF32(point_y, (xb_vecN_2xf32)param->right),
                      (xb_vecN_2xf32)y_scale);

    // float32_t -> int32_t
    xb_vecN_2x32v vi_idx = IVP_TRUNCN_2XF32(vf_idx, 0);
    xb_vecN_2x32v vi_idy = IVP_TRUNCN_2XF32(vf_idy, 0);

    // 将idy存在高16位,idx存在低16位
    xb_vecN_2x32v pillar_index = IVP_SLLN_2X32(vi_idy, 16);
    pillar_index = IVP_ADDN_2X32(pillar_index, vi_idx);

    // 判断点云数据是否有效
    vboolN_2 px_le = IVP_ULEN_2XF32(point_x, param->back);
    vboolN_2 px_ge = IVP_ULEN_2XF32(param->front, point_x);
    vboolN_2 py_le = IVP_ULEN_2XF32(point_y, param->right);
    vboolN_2 py_ge = IVP_ULEN_2XF32(param->left, point_y);
    vboolN_2 pz_le = IVP_ULEN_2XF32(point_z, param->bottom);
    vboolN_2 pz_ge = IVP_ULEN_2XF32(param->top, point_z);

    vboolN_2 skip = IVP_ORBN_2(px_le, px_ge);
    skip = IVP_ORBN_2(skip, py_le);
    skip = IVP_ORBN_2(skip, py_ge);
    skip = IVP_ORBN_2(skip, pz_le);
    skip = IVP_ORBN_2(skip, pz_ge);
    // 将无效的点云数据的伪图像坐标标记为-1
    pillar_index = IVP_MOVN_2X32T(-1, pillar_index, skip);
    // 存储伪图像坐标到输出
    IVP_SCATTERN_2X32(pillar_index, p_output, id_offset);

    // 分别对五维点云输入进行特征编码和量化,第五维只需要量化
    xb_vecN_2x32v const vi_feature_x =
        encoder_cp(point_x, sub[0], div[0], scale);

    xb_vecN_2x32v const vi_feature_y =
        encoder_cp(point_y, sub[1], div[1], scale);

    xb_vecN_2x32v const vi_feature_z =
        encoder_cp(point_z, sub[2], div[2], scale);

    xb_vecN_2x32v const vi_feature_r =
        encoder_cp(point_r, sub[3], div[3], scale);

    xb_vecN_2x32v const vi_feature_t =
        quantize_round_nearest(point_t, scale);

    // 合并特征编码和量化后的xyzr数据为一个int32_t
    xb_vecN_2x32v const vi_feature_x_y = IVP_SELN_2X32I(
        vi_feature_y, vi_feature_x, IVP_SELI_8B_INTERLEAVE_1_EVEN);

    xb_vecN_2x32v const vi_feature_z_r = IVP_SELN_2X32I(
        vi_feature_r, vi_feature_z, IVP_SELI_8B_INTERLEAVE_1_EVEN);

    xb_vecN_2x32v const vi_feature_x_y_z_r = IVP_SELN_2X32I(
        vi_feature_z_r, vi_feature_x_y, IVP_SELI_INTERLEAVE_1_EVEN);

    IVP_SCATTERN_2X32(vi_feature_x_y_z_r, p_output, xyzr_offset);

    // 将量化后的t数据存储为一个int32_t
    IVP_SCATTERN_2X32(vi_feature_t, p_output, t_offset);

    p_input += in_data_per_cycle;
    p_output += out_data_per_cycle;
  }
  // 刷新输出
  IVP_SCATTERW();
}
10.4.5.4.2. 体素化(CPU访存部分)
处理逻辑和CPU参考实现基本一致,主要有以下几点区别:
使用二维数组查找表,并且直接使用伪图像的
x,y作为索引。输出
voxel_data的索引计算方式不同,因为DSPgather/scatter不能超出64kB的地址空间限制,因此提前按照最终特征数据的shape进行计算输出索引。
static int32_t gen_voxel_for_dsp(
hbSysMem &coords_mem,
hbSysMem &voxel_mem,
uint32_t &total_voxel_num,
FeatureInfo const *feature_info,
std::vector<std::vector<VoxelInfo>> &coord_to_voxel_id,
int32_t x_length,
int32_t y_width,
DSPPointPillarPreProcessParam const ¶m) {
// 初始化二维查找表
init_voxel_info_lut(coord_to_voxel_id, y_width);
uint16_t max_voxel_idx{0U};
uint16_t max_voxel_idy{0U};
VoxelInfo cur_voxel_info{0U, 0xFFFFU};
int32_t *voxel_data{reinterpret_cast<int32_t *>(voxel_mem.virAddr)};
int32_t *coords{reinterpret_cast<int32_t *>(coords_mem.virAddr)};
for (int32_t i{0}; i < param.num_points; ++i) {
uint16_t const idx{feature_info[i].idx};
uint16_t const idy{feature_info[i].idy};
// 更新voxel坐标和voxel中的点数
bool const skip{calc_coordinate(coords,
total_voxel_num,
cur_voxel_info,
max_voxel_idx,
max_voxel_idy,
idx,
idy,
param,
coord_to_voxel_id)};
// 无效点云或voxel中的点数超过最大值时跳过更新voxel_data
if (skip) {
continue;
}
// 根据voxel索引坐标和点数计算voxel_data偏移并更新数据
uint32_t const total_offset{k_wc * cur_voxel_info.index +
cur_voxel_info.num};
voxel_data[total_offset] = feature_info[i].xyzr;
}
// 重置无效的voxel坐标信息
reset_invalid_coords(coords, param.max_num_points, total_voxel_num);
hbSysFlushMem(&coords_mem, HB_SYS_MEM_CACHE_CLEAN);
}
10.4.5.4.3. 转置
将 AoS 格式的点云转置为 SoA 格式。
static FORCE_INLINE void transpose_kernel(TileBuffer *input,
                                          TileBuffer *output,
                                          xb_vecNx16U offset,
                                          int32_t dim) {
  // 根据SIMD的数据长度和输入维度计算每个周期处理的数据大小
  int32_t const data_per_cycle = XCHAL_IVPN_SIMD_WIDTH * 2 * dim;
  int32_t data_width = input->data_size / (data_per_cycle * sizeof(int8_t));
  if ((input->data_size % (data_per_cycle * sizeof(int8_t)) != 0) ||
      data_width == 0) {
    ++data_width;
  }

  int8_t const *__restrict p_input =
      (int8_t const *__restrict)input->tile_buffer;

  xb_vec2Nx8 *__restrict p_output =
      (xb_vec2Nx8 * __restrict) output->tile_buffer;

  int32_t const input_offset = XCHAL_IVPN_SIMD_WIDTH * dim;

  valign a_store = IVP_ZALIGN();
  for (int32_t i = 0; i < data_width; ++i) {
    xb_gsr gr1 = IVP_GATHERANX8S(p_input, offset);
    xb_gsr gr2 = IVP_GATHERANX8S(p_input + input_offset, offset);

    xb_vec2Nx8 feature = IVP_GATHERD2NX8_L(gr1);
    IVP_GATHERD2NX8_H(feature, gr2);
    // 将gather后的数据连续存储到输出
    IVP_SA2NX8_IP(feature, a_store, p_output);
    p_input += data_per_cycle;
  }
  IVP_SAPOS2NX8U_FP(a_store, p_output);
}
10.4.5.5. 一致性校验
分别导出CPU和DSP参考实现的点云前处理输出特征数据和坐标信息到文件,比对文件内容是否一致,如果一致则通过一致性校验。
// dump坐标信息
void dump_coords(int32_t const *coords, std::string const &file, size_t size) {
  std::ofstream fd_output(file, std::ios::trunc);
  VLOG(EXAMPLE_DEBUG) << "dump coords to " << file;
  for (size_t i{0U}; i < size; ++i) {
    fd_output << coords[i] << "\n";
  }
}

// dump特征数据
void dump_features(int8_t const *features,
                  std::string const &file,
                  size_t size) {
  std::ofstream fd_output(file, std::ios::trunc);
  VLOG(EXAMPLE_DEBUG) << "dump features to " << file;
  for (uint32_t i{0U}; i < size; ++i) {
    fd_output << static_cast<int32_t>(features[i]) << "\n";
  }
}
在 AI Benchmark 中,可以执行完整的全流程精度评测,当前DSP参考实现与CPU参考实现精度完全一致。
提示
如果您不要求DSP实现的精度与CPU实现具有完全一致的精度,那么可以通过优化浮点运算来进一步提升性能。例如,通过将耗时的除法运算替换为乘法运算。
10.4.5.6. 性能评测
在 AI Benchmark 中,执行 CenterPoint 模型的延时测试,比较CPU和DSP参考实现的单帧延时。点云前处理的耗时与输入数据的分布,有效点云的数量相关,以下性能测试结果只反映当前测试数据集下的性能。
测试数据集:
# nuscenes_lidar/nuscenes_lidar.lst
../../../mini_data/nuscenes_lidar/64d019bf33ba4dcb9eca5e5ab2ef967e.bin
../../../mini_data/nuscenes_lidar/163b70e627854893b88575caf85a56ea.bin
../../../mini_data/nuscenes_lidar/1e900112bcaa453992d9753b465a7d01.bin
../../../mini_data/nuscenes_lidar/21b99febc5c14f7385e787fe81e96670.bin
../../../mini_data/nuscenes_lidar/49f8376cd6b34f07b20ed6d5b5b42acd.bin
../../../mini_data/nuscenes_lidar/5e63770fc35945f1a6a7b1ecd2d9e459.bin
../../../mini_data/nuscenes_lidar/6eb8a3ff0abf4f3a9380a48f2a0b87ef.bin
../../../mini_data/nuscenes_lidar/877f55a6d8324fefb5e0f5e0bac3d7c1.bin
../../../mini_data/nuscenes_lidar/9a7dc9c8adce4ae68ca26ad5b5f93366.bin
../../../mini_data/nuscenes_lidar/b10f0cd792b64d16a1a5e8349b20504c.bin
../../../mini_data/nuscenes_lidar/cc50000970584ba5aaf14760b1ced696.bin
../../../mini_data/nuscenes_lidar/d51bc02e54794cf38c6ea68071c70de2.bin
../../../mini_data/nuscenes_lidar/d929c9294e4348c58edceeb460d2e083.bin
../../../mini_data/nuscenes_lidar/f286cdaef36648cba3b6a24d2178dc8a.bin
../../../mini_data/nuscenes_lidar/f56a544064a548a39a81f18cc8f633c5.bin
../../../mini_data/nuscenes_lidar/fd8420396768425eabec9bdddf7e64b6.bin
单线程单帧延时测试结果:
实现 |
avg |
max |
min |
|---|---|---|---|
CPU参考实现 |
119.374ms |
206.633ms |
57.109ms |
DSP参考实现(方案一) |
23.251ms |
31.437ms |
18.223ms |
DSP参考实现(方案二) |
16.126ms |
17.841ms |
15.042ms |
注解
DSP参考实现(方案二)为本章节描述的先量化输入点云数据的方案,而DSP参考实现(方案一)则是将特征编码和量化置于体素化之后的方案。 为了方便参考,这里列出了两种方案的相关性能评测数据。从数据中可以看成,引入更多的计算量可以有效减少访存数据,从而实现更高的性能收益。
10.4.5.7. PointPillars前处理实现简介
PointPillars 四维点云前处理与 CenterPoint 五维点云前处理的基本处理逻辑相同,主要有以下两点区别:
1.点云输入维度不同
2.点云前处理后的输出 layout 不同
针对以上两点差异,以下将分别阐述DSP加速实现上的不同之处:
1.点云输入维度不同
PointPillars四维点云输入经过量化后,其数据大小正好适配int32_t类型,无需像CenterPoint那样对第五维量化后的数据进行padding操作以适配int32_t类型。第一步计算伪图像坐标,特征编码和量化步骤的输入输出
TCM大小比例不同。CenterPoint为5:3,PointPillar为2:1,输入为四维浮点点云数据(float32_t),输出为伪图像坐标(int32_t)和量化后的xyzr数据(int32_t)由于维度的差异,对输入点云的
gather操作所需的offset计算不同.
2.点云前处理后的输出 layout 不同
在体素化(CPU访存)步骤中,
voxel_data的offset计算方式存在差异.由于输出
layout不同,转置部分的输入输出TCM大小比例存在差异。CenterPoint的比例为5:1,而PointPillars的比例为4:1。转置的处理逻辑不同,具体的差异参见下图。
CenterPoint:
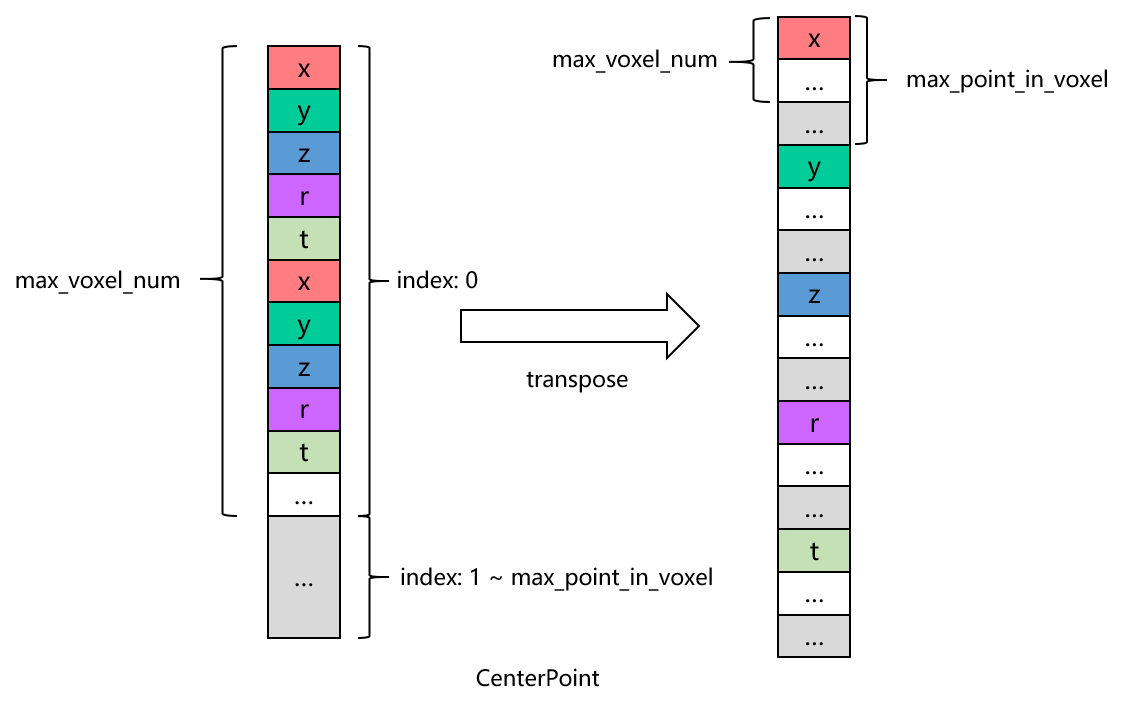
PointPillars:
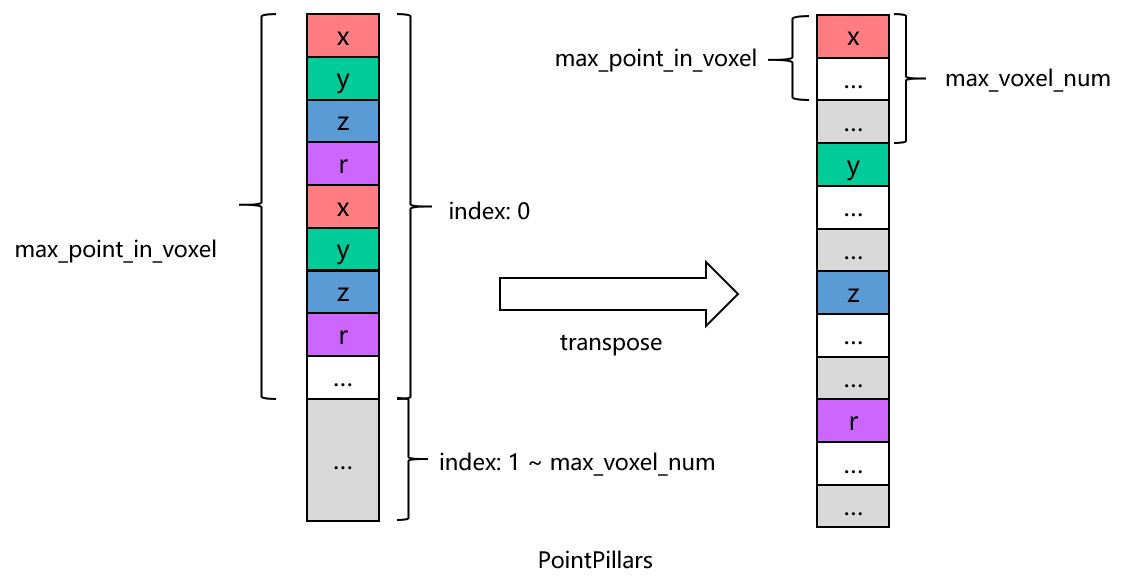
注解
根据图示, CenterPoint 和 PointPillars 在 max_point_in_voxel 和 max_voxel_num 的顺序上存在差异,这导致了无效数据的分别不同。
具体来说, PointPillars 的无效数据呈现出较为集中的分布特点,这有助于进行连续处理。
相反, CenterPoint 的无效数据则散布在各个 voxel 之间,呈现出交叉分布的特点。
前处理的参数对算子的实现效率会有一定影响,可以进一步考虑根据不同的参数实现特定的逻辑。